In the world of YouTube, where content creators strive to captivate their audience with engaging videos, one key element often overlooked is lighting. When it comes to faceless YouTube videos, where the creator’s identity is concealed, finding the perfect lighting setup can be a game-changer. Whether you’re a makeup guru showcasing intricate techniques or a gamer narrating thrilling gameplay, the right lighting can enhance the visual quality of your videos and keep viewers hooked. In this article, we will explore the secrets behind creating the ideal lighting setup for faceless YouTube videos, ensuring that your content shines and leaves a lasting impression on your audience.

This image is property of images.wondershare.com.
Importance of Lighting in Faceless YouTube Videos
Lighting plays a crucial role in creating high-quality faceless YouTube videos. While your face may not be the focus, proper lighting ensures that your content is visually engaging and clear to your viewers. The right lighting setup enhances the overall aesthetics, improves video quality, reduces shadows and glare, and creates depth and separation. Understanding different lighting equipment, choosing the right lighting setup, positioning and setup tips, dealing with specific lighting challenges, enhancing lighting with accessories, and optimizing lighting techniques for different genres are all essential aspects to consider when setting up your lighting rig for faceless YouTube videos.
Understanding Different Lighting Equipment
Natural Lighting
Natural lighting refers to using the sun’s light as the primary source of illumination. It is free, readily available, and offers a soft, diffused light that is flattering for most subjects. Shooting near a window or outdoors during the day can provide excellent natural lighting. However, natural lighting can be inconsistent due to weather conditions, time of day, and changes in the sun’s position.
Ring Light
A ring light is a circular light that typically consists of LED bulbs arranged in a ring shape. It is often used in beauty and portrait photography due to its ability to create an even, shadowless illumination on the subject’s face. Ring lights come in different sizes and can be mounted on a tripod or attached to a camera or smartphone.
Softbox
A softbox is a versatile lighting tool that diffuses light and creates a soft, even illumination. It consists of a box-like structure with a reflective inner lining and a diffusing outer material. Softboxes are commonly used in professional studios and come in various shapes and sizes, including rectangular, octagonal, and strip. They can be mounted on light stands or used with lighting kits.
LED Panels
LED panels are flat, rectangular lights that provide a wide range of adjustable lighting options. They are energy-efficient, produce less heat, and offer consistent lighting output. LED panels come in different sizes, and their brightness and color temperature can be adjusted to suit your specific needs. They are often used in video production, photography, and film sets.
Choosing the Right Lighting Setup
Consider the Video Content
The type of video content you create will influence your lighting setup. Consider whether you are shooting indoors or outdoors, the mood or tone of your video, and the type of subjects or objects you will be focusing on. Different lighting setups may be more suitable for tutorials, interviews, product reviews, or vlogs.
Evaluate Your Budget
Budget is an important factor to consider when choosing lighting equipment. Determine how much you are willing to invest in your lighting setup and prioritize the essential components based on your budget. While high-end lighting equipment can offer superior lighting quality, there are also affordable options available that can still produce satisfactory results.
Assess the Space and Background
The size and layout of your filming space will affect your lighting choices. Consider the available space for positioning your lights, the distance between your subject and the background, and any potential obstacles or reflections. Additionally, the color and texture of your background should complement your lighting setup to enhance the overall visual appeal.
Determine the Lighting Color Temperature
Color temperature refers to the warmth or coolness of light. It is measured in Kelvin (K), with lower values indicating warmer light and higher values indicating cooler light. Consider the desired mood and atmosphere of your video and choose a lighting color temperature that best suits your needs. Warm light (around 3000K) can create a cozy and intimate ambiance, while cooler light (around 6000K) can give a more professional and modern look.
Tips for Lighting Positioning and Setup
Front Lighting Techniques
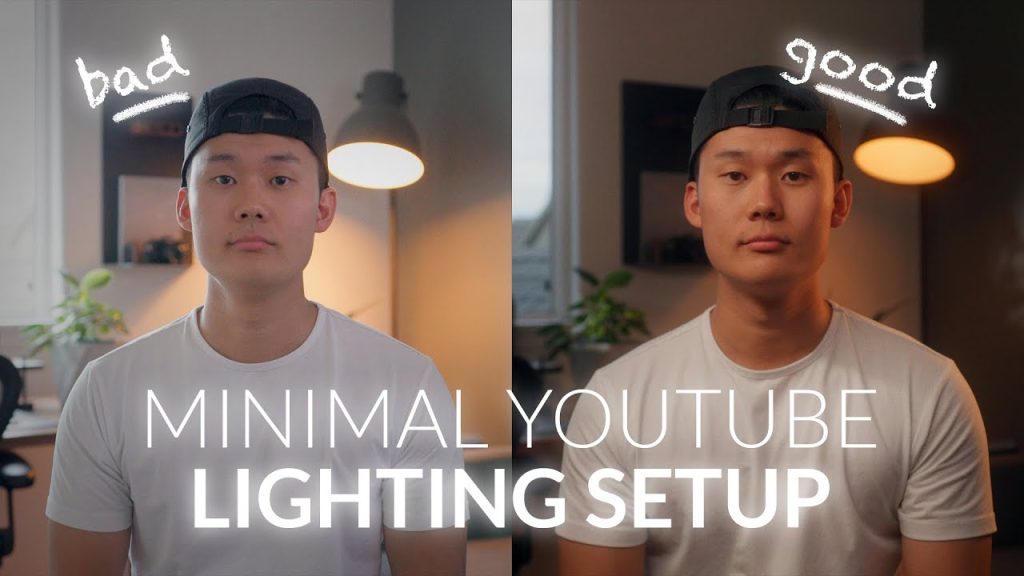
Front lighting illuminates the subject directly from the front, ensuring even lighting and reducing shadows. This technique is commonly used for faceless YouTube videos to ensure clarity and visibility of objects or demonstrations. Place your lights in front of you and adjust their distance and angle to achieve the desired level of illumination.
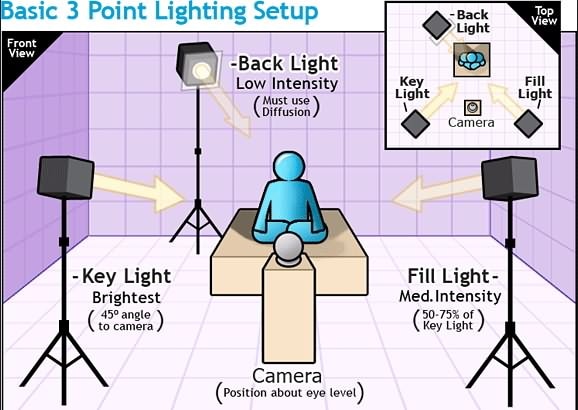
Three-Point Lighting
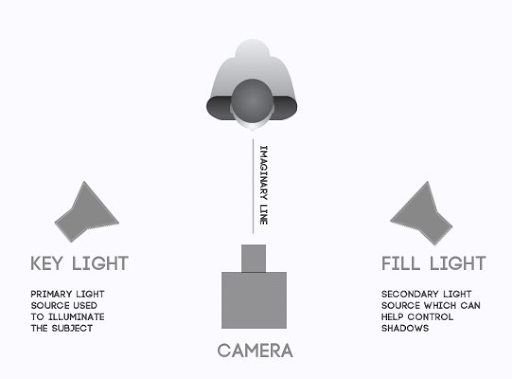
Three-point lighting is a classic lighting setup that uses three light sources to create depth and separation. The key light is the primary light source and should be positioned in front and slightly to one side of your subject. The fill light helps to fill in shadows and is placed on the opposite side of the key light. The backlight is positioned behind your subject to create separation between the subject and the background.
Backlighting for Depth and Separation
Backlighting adds depth and separation by placing a light source behind your subject. It can help create a halo effect around the edges of your subject, making them stand out from the background. Experiment with different backlight angles and intensities to find the right balance and avoid overexposure.
Diffusing and Bouncing Light
To soften the harshness of direct lighting, you can use diffusers or bounce the light off reflective surfaces. Diffusers, such as softboxes or translucent umbrellas, scatter the light and create a more flattering and natural-looking illumination. Bouncing light off walls, ceilings, or reflectors can also help achieve a softer and more diffused lighting effect.
Setting Up a Lighting Rig for Faceless Videos
Lighting in a Small Space
If you have limited space for your faceless YouTube videos, consider compact lighting options such as ring lights or LED panels. These lights are portable and can be easily positioned in smaller areas. Utilize the available space efficiently by experimenting with different lighting setups and settings to achieve the desired lighting quality.
Lighting on a Budget
If you are on a tight budget, there are affordable lighting options available that can still produce satisfactory results. Consider purchasing entry-level LED panels or ring lights, which are often cheaper than professional-grade equipment. Additionally, make use of natural lighting by shooting near a window or outdoors during daytime.
Lighting for Different Backgrounds
Different backgrounds require different lighting setups to enhance their visual appeal. If you have a plain or solid-colored background, focus on illuminating your subject evenly while minimizing shadows. For textured or patterned backgrounds, consider using backlighting or adding some depth to the background by positioning lights strategically.
Dealing with Specific Lighting Challenges
Minimizing Shadows
Shadows can be distracting and reduce the visibility of your faceless YouTube videos. To minimize shadows, position your lighting sources at different angles and distances to create a more even lighting distribution. Use fill lights or reflectors to bounce light onto the shadows and reduce their intensity.
Avoiding Glare and Reflections
Glare and reflections can be problematic, especially if you are using glasses or filming reflective surfaces. To avoid glare, adjust the position and angle of your lighting sources to minimize the light bouncing off the reflective surfaces. Consider using polarizing filters on your camera lens or anti-glare coatings on your glasses to reduce reflections.
Managing Lighting in Glasses
If you wear glasses and want to avoid unwanted reflections or distortion, position your lights slightly above or below eye level to minimize the light reflecting off your glasses. Angle the lights away from the camera to reduce the chances of glare. Additionally, using anti-glare coatings on your glasses or adjusting the lighting color temperature can help improve the overall appearance.
Controlling Ambient Light
Ambient light refers to the existing or natural light in the environment. While it can sometimes enhance your faceless YouTube videos, it can also create unwanted lighting inconsistencies and color shifts. Control ambient light by using curtains, blinds, or light-blocking materials to limit the amount of external light entering your filming space. If necessary, adjust your artificial lighting to match or balance the ambient light.

This image is property of i.ytimg.com.
Enhancing Lighting with Accessories
Using Color Gels and Filters
Color gels or filters can be used to modify the color temperature or add creative effects to your lighting setup. They are thin, transparent sheets that can be placed in front of your lighting sources to change the color of the light. Experiment with different colors and intensities to create unique and visually appealing effects that suit your video content.
Adding Dimmers and Light Modifiers
Dimmers allow you to adjust the brightness of your lights, providing more control over the lighting intensity. Light modifiers, such as grids, snoots, or barn doors, can shape and direct the light, providing more precision in illuminating specific areas or controlling light spill. These accessories help fine-tune your lighting setup and create the desired lighting effects.
Incorporating Light Diffusers and Reflectors
Light diffusers soften the harshness of direct lighting and create a more flattering illumination. Umbrellas, softboxes, or diffuser panels can be added in front of your lights to scatter and diffuse the light. Reflectors, on the other hand, can bounce and redirect light onto your subject, filling in shadows and adding more dimension to your faceless YouTube videos.
Optimizing Lighting Techniques for Different Genres
Vlogging and Personal Updates
For vlogging and personal update videos, prioritize even and flattering lighting that enhances your appearance on camera. Use front lighting techniques, such as ring lights or diffused natural lighting, to minimize shadows and create a clear and engaging image. Pay attention to the color temperature and aim for a warm and inviting atmosphere.
Tutorials and Demonstrations
When creating tutorials or demonstrations, lighting that ensures visibility and clarity is crucial. Utilize front lighting or three-point lighting setups to eliminate shadows and provide even illumination on the subject and any props or objects. Consider using backlighting or additional lighting sources to highlight specific details or steps.
Product Reviews and Unboxings
Product reviews and unboxing videos often require detailed shots and close-ups. Utilize a combination of front lighting and side lighting to enhance the textures and details of the products. Consider diffusing or bouncing the light to avoid harsh reflections on glossy surfaces. Experiment with different lighting angles and intensities to achieve the desired visual impact.
Interviews and Panel Discussions
For interviews and panel discussions, it is important to ensure proper lighting for all participants. Use a combination of front and side lighting to illuminate each individual evenly and reduce shadows. Pay attention to the overall balance of the lighting to avoid one person being significantly brighter or darker than the others. Consider using adjustable LED panels to accommodate varying setups and configurations.

This image is property of i.ytimg.com.
Importance of Lighting Tests and Adjustments
Testing Lighting Setups Before Recording
Before recording your faceless YouTube videos, it is essential to test your lighting setup to ensure optimal results. Set up your lights, adjust their positions and angles, and observe how they affect the lighting quality. Test different lighting techniques and make any necessary adjustments before starting the actual recording. This will save you time and effort in post-production editing.
Evaluating Shadows and Lighting Ratios
During your lighting tests, pay attention to the presence of shadows and the balance between different lighting sources. Assess the intensity and direction of the shadows to minimize any distracting or unflattering effects. Evaluate the lighting ratios between the key light, fill light, and backlight to create a visually pleasing balance and depth in your faceless YouTube videos.
Making Adjustments for Optimal Quality
Based on your lighting tests, make any necessary adjustments to achieve optimal lighting quality. Fine-tune the position, angle, and intensity of your lights to eliminate shadows, reduce glare, and enhance the overall visual appeal. Remember to take into account the recommendations specific to your video content, genre, and shooting environment.
Post-Production Tips for Improving Lighting
Adjusting Exposure and Brightness
In post-production editing software, you can adjust the exposure and brightness levels of your faceless YouTube videos. This can help balance the lighting and correct any overexposed or underexposed areas. Use these tools sparingly to avoid compromising the overall image quality and maintaining a natural look.
Correcting White Balance
White balance refers to the accuracy of colors in your video footage. In post-production, you can adjust the white balance to correct any color casts caused by incorrect lighting. Use the white balance tools available in your editing software to ensure that the colors in your faceless YouTube videos appear true to life and consistent.
Enhancing Colors and Contrast
During post-production, you can enhance the colors and contrast of your faceless YouTube videos to make them more visually appealing. Adjust the saturation and vibrance levels to make the colors pop without appearing unnatural. Boosting the contrast can add depth and dimension to your footage, creating a more engaging viewing experience.
Adding Lighting Effects
If you want to add creative lighting effects to your faceless YouTube videos, post-production editing software offers a wide range of options. Experiment with filters, overlays, or light flares to add a unique touch to your videos. However, use these effects sparingly and ensure that they enhance rather than distract from the overall content.
In conclusion, when creating faceless YouTube videos, the importance of lighting cannot be overstated. Understanding the different lighting equipment available, choosing the right lighting setup based on video content, budget, space, and color temperature, and following positioning and setup tips are crucial steps in creating visually appealing videos. Additionally, addressing specific lighting challenges, enhancing lighting with accessories, optimizing techniques for different genres, conducting lighting tests, and making adjustments to achieve optimal quality are key aspects to consider. By paying attention to lighting both during filming and in post-production, you can produce high-quality faceless YouTube videos that captivate your viewers.

This image is property of ghost.playplay.com.


